Help center
New to AdOmni? You’re in the right place. Our help center makes it easy—learn the platform, pick up proven strategies, and get the most out of JEEN AI.
-
Getting started
-
Build a campaign faster with JEEN AI
-
Campaign planning strategies
-
Programmatic DOOH best practices
-
Get a teammate up to speed
Common Questions
How do I create a campaign group?
How do I add another team member?
What if a new team member needs a training session?
What is programmatic DOOH?
How can I activate my campaign through The Trade Desk?
How do I create a campaign group?
In your Adomni account, click on the Campaign Groups tab at the top left of your dashboard. From here, click New Group, then enter your desired Group Name and Budget. Once the group is created, you can add campaigns by returning to the Campaigns tab. Click the three dots next to the campaign you want to include, select Add to Group, and repeat this step for each campaign you want grouped together. Campaign groups make it easier to manage, compare, and report on related campaigns.
How do I add another team member?
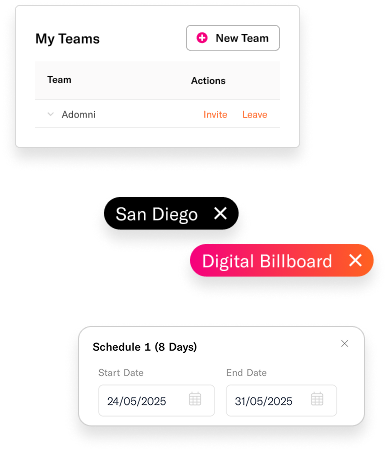
To invite a new team member, click the Account Settings button in the top right corner of your account. On the Account Details page, scroll to the My Teams section. Click Invite, enter your teammate's email address, and click Send Invite. They'll receive an email invitation to join your account. Team management lets you easily share access, coordinate campaigns, and collaborate more effectively.
Watch this video to learn more - AdOmni Account Overview and Inviting Users
What if a new team member needs a training session?
Additional training sessions can be purchased anytime from the Add-Ons tab in your Adomni account. New to Adomni? We offer a complimentary onboarding demo to get you up and running — just click the button in the platform to get started.
What is programmatic DOOH?
Programmatic Digital Out-of-Home (DOOH) advertising allows you to purchase digital ad space on real-world screens, such as billboards, gyms, malls, airports, and rideshares using automated, data-driven technology. Instead of negotiating for specific screens, Adomni provides access to millions of available screens across the globe. Screen availability may vary based on demand, but programmatic DOOH makes it easy to scale campaigns, target audiences, and optimize spend with flexibility.
How can I activate my campaign through The Trade Desk?
Campaigns activated through The Trade Desk (TTD) fall under Adomni's Managed Services, offered at no additional cost. Here's how it works:
- Adomni collects campaign details such as budget, flight dates, goals, and targeting market / venue type preferences.
- We build a customized campaign plan for your review.
- After approval, Adomni pushes the plan into your TTD seat as custom PMP deals.
- You accept the deals and launch the campaign within your TTD account.
This workflow ensures your DOOH campaigns are professionally planned and set up for success. To begin, contact support@adomni.com or reach out to your CSM.
How can I see a device list?
How can I upload the device list?
How do I download/re-upload the device list?
How to choose the right amount of devices for my campaign?
What is the Budget Allocation section?
What is the best way to choose a screen within my budget?
What is dayparting?
How does target plays per hour work?
How do I change my margin?
What should I make my CPM/Impression Goal?
How do I remove the CPM from campaigns?
How can I see a device list?
From the campaign edit page, click the Details dropdown on the right side of the key metrics tray. Scroll all the way to the bottom of the section and select the link labeled Device List CSV. This allows you to download a full list of the devices associated with your campaign.
How can I upload the device list?
On the campaign edit page, navigate to the Geo-Targets & Venue Types tab. Scroll to the bottom and expand the Advanced section. Here you’ll see options to either include or exclude devices. Click Import, upload your CSV file of device IDs, and save. For best results, paste your device IDs into the provided template before uploading.
How do I download/re-upload the device list?
Our platform allows you to download a full device list that includes screen names and detailed location information. This is a very efficient way to exclude inventory in bulk.
To download the device list:
- Go to the Summary tab within the campaign edit page.
- Scroll past the venue type metrics.
- Click the pink Download Device List CSV button.
Once downloaded, you can filter the CSV as needed. For example, you can filter by venue type (i.e., convenience stores), then remove the rows for any specific placements you would like to exclude.
Helpful tip: Filter the screen name column by keywords such as “smoke” or “vape” and bulk delete those rows if applicable.
After removing the devices you do not want included, save the updated CSV file.
To upload the revised list back into the platform:
- Navigate to the Geo Targets & Venue Types tab.
- Scroll to the very bottom and click the Advanced dropdown on the lower left.
- Under Individual Location Selection, keep the selection set to “Include.”
- Click Import and upload your edited CSV file.
Once imported, the campaign will update to include only the devices listed in that CSV.
Please note: When a CSV is uploaded, the campaign will only reference those specific devices. If you would like to add additional locations or venue types later, you will need to remove the uploaded CSV first in order to see and select new inventory. For that reason, this step is typically best completed toward the end of the campaign planning process.
How to choose the right amount of devices for my campaign?
Start by setting your campaign schedule, budget, and preferred venue types. The Key Metrics Tray will populate estimated impressions, CPM, and delivery pacing. Then open the Details dropdown to see screen utilization and play usage. A good rule of thumb is:
- Aim for 90–100% of screens utilized
- 20–40% play usage
- 3–4 plays per hour
If your campaign metrics don’t align, add or remove devices and venues until you hit these ranges.
What Is the Budget Allocation section?
The Budget Allocation section is used only if you want to break out portions of your total budget across specific inventory groupings such as Market or Venue Type.
For example, if you wanted 50% of your total budget to go toward Grocery Stores, you would:
- Select the allocation strategy (Info on the difference of the two below)
- Choose Venue Type as the inventory grouping
- Select Grocery Stores
- Enter 50 percent as the target spend
Allocation Strategy:
- Soft Allocation - Guides the system to aim for that percentage but does not strictly guarantee it (If you have very specific hard allocations, we recommend creating separate campaigns per your strategy)
- Not to Exceed - Ensures that the selected grouping will not spend more than the amount you specified
If you are not setting specific breakout rules, the system will simply optimize across your targeting to drive the best performance within your total budget.
There is no risk of overspending your total campaign budget, as the Budget Allocation Strategy setting is for controlling the breakouts of your total budget.
What is the best way to choose a screen within my budget?
First, enter your campaign’s budget and dates. Then filter by the desired geography and venue types. Next, compare the daily budget with the CPMs of your selected venues. Use the Key Metrics Tray to review hourly pacing and screen utilization. This helps confirm whether your chosen screens and budget are aligned with your goals. Adjust filters, dayparts, and venue mixes as needed until the plan fits your budget.
What is dayparting?
Dayparting is a scheduling tool that allows you to specify when your ads run within your overall campaign dates. Instead of running continuously, you can choose specific days of the week or times of day. For example, a coffee brand may focus on mornings, while a restaurant may emphasize lunch and dinner hours. Dayparting ensures ads reach your audience during peak times, making your budget work more effectively.
- Campaign Start/End Times: Define the overall duration of your campaign.
- Dayparting: Defines when within that period your ads will play.
How does target plays per hour work?
Target Plays Per Hour lets you control how often your ad appears on each selected screen in an hour. For example, if you set it to 4, your ad will aim to display four times per hour per screen, provided inventory and budget allow. This feature helps you balance exposure frequency with budget, ensuring consistent visibility throughout your campaign.
Keep in mind that the actual number of plays may vary slightly due to factors like screen availability, other advertisers’ bookings, and your campaign’s budget constraints.
How do I change my margin?
From the campaign edit page, go to Campaign Details (just below the targetable screen count). In this section, you’ll find your budget information. Directly below the budget field is the margin field. Enter your desired margin percentage and save the campaign. The system will apply the margin across your campaign plan.
What should I make my CPM/Impression Goal?
You will now see a field under the Budget section in the Advanced drop down labeled “CPM / Impression Goal.” You can input your CPM/impression goal, which should keep in consideration the CPM forecast.
Once added to a campaign, your reporting will display progress toward your CPM/impression goal as well as your total spend.
Additionally, the campaign share page, which you may use internally or with clients, will display the CPM goal in the key metrics bar instead of the forecasted CPM.
We recommend setting a realistic CPM goal based on the CPM forecast, with additional buffer where appropriate or needed. The padded buffer in the CPM allows the system to run with more space to reach the intended goal, as the forecast is an estimate.
Please note: The CPM goal is for tracking and reporting purposes only. It does not impact pacing, optimization, or programmatic bidding behavior.
How do I remove the CPM from campaigns?
- Open the Campaign Edit Page
- From your Campaign Dashboard, click on the campaign name to open the edit view.
- Access the Share Settings
- In the top-right corner, just below the campaign status, click the orange Share button (represented by a “less than” symbol with dots on each end).
- Adjust the Presentation Style
- Under Presentation Style, use the dropdown menu to change the setting from Standard to CPM / Budget Removed.
- Share or Save Your Settings
- To email the campaign directly, click Share Campaign Plan.
- Or, click Save and Close to exit the share settings.
- Finalize Your Changes
- Before leaving the edit page, make sure to save the campaign so your changes are applied.
- Access the Updated Share Link
- Back on the Campaign Dashboard, click the three dots to the left of the campaign name and select View Campaign Plan. This link is your updated, shareable campaign plan with the budgets and CPMs now hidden.
Table of contents
What are the creative specifications (file formats or file sizes) needed for uploading assets to the AdOmni platform?
How can I resize my images?
How do I upload my creative content?
How can I generate mock-ups?
What are the most common reasons a creative asset is rejected?
What content is commonly prohibited?
Can I include a QR code in my creative for digital billboards?
Are there any special restrictions for creative assets on cinema screens?
What are best practices for creative design?
Where can I find more design tips?
What are landlord or third-party approvals, and how do they impact my campaign?
What are the creative specifications (file formats or file sizes) needed for uploading assets to the AdOmni platform?
Image Requirements
- Accepted formats: JPG or PNG
- Resolution: 72–150 dpi
- Images must be uploaded at the exact pixel dimensions required by the campaign in order to be added successfully.
Video Requirements
- Accepted formats: MOV or MP4
- Frame rate: 30 fps
- Compression: 6–10 Mbps
- Videos must match the exact size and duration specified in the campaign requirements to upload properly.
If you need help resizing or formatting your creative, please feel free to reference this quick video guide.
How can I resize my images?
In your campaign’s Ad Content tab, upload your creative and click Actions > Resize. You’ll see options to select different sizes. You can choose between letterboxing (black bars), cropping, or AI-powered generative fill to fit the desired size. This makes it easy to adapt your creative to multiple screen formats.
How do I upload my creative content?
Go to the Ad Content tab, then click Bulk Assign Ads. Select Upload, then drag and drop, paste, or choose files from your computer. Once uploaded, your creatives will appear in your library and can be assigned to your campaign.
How can I generate mock-ups?
In your Adomni account, hover over the Content Library and select Mockup Generator. Enter a title, then select or upload creatives. You can choose specific venue types for mockups or leave the default option to generate across all. Click Generate Mockups to create previews. You can then download images or share them via a link. This tool is useful for previewing and presenting how your ads will look in real-world environments.
Watch this video to learn more - The Mockup Generator
What are the most common reasons a creative asset is rejected?
Creative assets may be rejected for several reasons, including:
- Non-Compliance with Content Guidelines: Content that is offensive, political, or inappropriate for public display is not allowed.
- Incorrect Specifications: Creative assets must match the required dimensions, file size, and format for the selected screen.
- Low Image Quality: Blurry visuals, unreadable text, or poor contrast can lead to rejection.
- Animation Issues: Some screens require full motion video
Missing Legal or Brand Elements: Required disclaimers, logos, or legal information must be included and clearly visible.
What content is commonly prohibited?
The following content types are typically not allowed:
- Adult or explicit material
- Violence or graphic imagery
- Competitive restrictions (ex., some malls or grocery stores don’t allow products to be advertised that aren’t sold at that location)
- Political or religious messaging (varies by screen type)
- Promotion of illegal products or services
Can I include a QR code in my creative for digital billboards?
No. QR codes are not permitted on roadside digital billboards for safety reasons, as scanning while driving can cause distraction.
QR codes may be used on:
- Indoor screens
- Pedestrian-facing displays
- Locations where scanning is safe and practical
Are there any special restrictions for creative assets on cinema screens?
Yes. Movie theaters often reject creatives that mention specific days of the week (such as “Friday” or “Saturday”) for competitive reasons.
Acceptable: “October 10th” or “10/10”
Not allowed: “This Friday” or “Every Saturday”
If you need to reference timing in your creative, always use specific dates rather than days of the week.
What are best practices for creative design?
To ensure your creative is clear, effective, and visually appealing, follow these guidelines:
- Use high-contrast colors and large, sans-serif fonts
- Keep text under ten words
- Use a single, clear image or focal point
Avoid light or white backgrounds for better visibility
Where can I find more design tips?
Visit the Adomni Content Design Tips page for examples, best practices, and detailed guidance on creative design.
What are landlord or third-party approvals, and how do they impact my campaign?
For certain high-profile or privately owned screen locations—often referred to as “spectaculars”—the building owner (landlord) must approve the creative before it can be displayed.
Even if a creative meets all technical and content guidelines, the landlord reserves the right to deny approval entirely at their discretion. This decision can be based on brand alignment, competitive conflicts, or aesthetic preferences unique to the property.
Third-Party Approval Delays: For high-profile locations such as airports, stadiums, or Times Square, additional third-party approvals may also be required before the creative can run.
These extra steps can sometimes result in delays or rejections if the creative does not meet the landlord’s or third party’s specific requirements.
Key tips:
- Landlord and third-party approvals are separate from media owner approvals.
- Decisions are final and non-negotiable.
Always allow extra time in your campaign schedule for review and approval.
How do I know my ads played?
What will happen if all of my impressions aren't delivered?
Why is my campaign launch delayed?
How do I optimize my campaign while it's running?
How do I lower my campaign’s CPM/increase impression delivery?
How do I increase ad spend delivery?
How do I know my ads played?
View campaign progress and delivery within the reporting dashboard of each campaign. From your Campaign Dashboard, click the three dots next to your campaign name and select Performance Report. This takes you to the campaign reporting dashboard where you can view detailed delivery data. You can also download reports—such as daily, device, DMA, and venue type delivery—in CSV format. This gives you full visibility into when and where your ads played.
What will happen if all of my impressions aren't delivered?
Adomni only bills for impressions actually delivered. If your campaign underdelivers, you’ll be invoiced for the delivered amount, not the full booked total. To improve delivery, check pacing and play usage in the Key Metrics Tray. If usage looks too high, adjust targeting or broaden venue selections to increase delivery potential.
Why is my campaign launch delayed?
When you click “launch,” your campaign doesn’t start running immediately. Instead, a few key processes happen behind the scenes to prepare it for delivery.
First, your creatives enter an approval process to ensure they meet platform and publisher standards. At the same time, the system validates your campaign settings—including targeting, pacing, bids, and flight dates—to confirm everything is configured correctly.
Once approved, your bids are loaded into the bid stream, and the Adomni DSP begins participating in real-time auctions across your selected inventory. As eligible screens that match your targeting become available, the system starts bidding and serving impressions.
Because of these steps, it’s normal to see a short delay between launching your campaign and the first signs of live activity.
If you observe a prolonged delay in delivery, here are key 3 items to check:
Campaign Info: Ensure your campaign has both an advertiser and an advertiser domain selected. The advertiser and domain should represent the brand featured in the ad—not the agency or media buyer.
- Example: Use “advertiser.com,” not “agency.com.”
Creative is in place: Check the Ad Content tab and confirm you have creatives uploaded for each required size. The Adomni system only allows creatives that meet the required specifications, so if you don’t see your desired creative when selecting from the content library, you may need to revise it.
Creative Approvals: Before your campaign can deliver, all creatives must be approved.
Creative approval begins only after your campaign is launched, so best practice is to launch 3–5 business days before your target start date.
- Note: Airport and spectacular venues have longer lead times for creative approvals. If your campaign includes these venues, build in an additional 3–5 business days for approval.
You can check the approval status of your creative within the ‘Ad Content’ tab of your campaign, pictured below.

PMP Application:
Inventory requiring PMP (Private Marketplace) deals will appear in your target screen pool if selected, but will not deliver without proper setup.
Be aware that some PMP networks require a minimum flight length or budget, which varies by network.
If your campaign includes networks that require PMP deal setup, contact your Adomni Client Success Manager to coordinate creation and application of PMP deals.
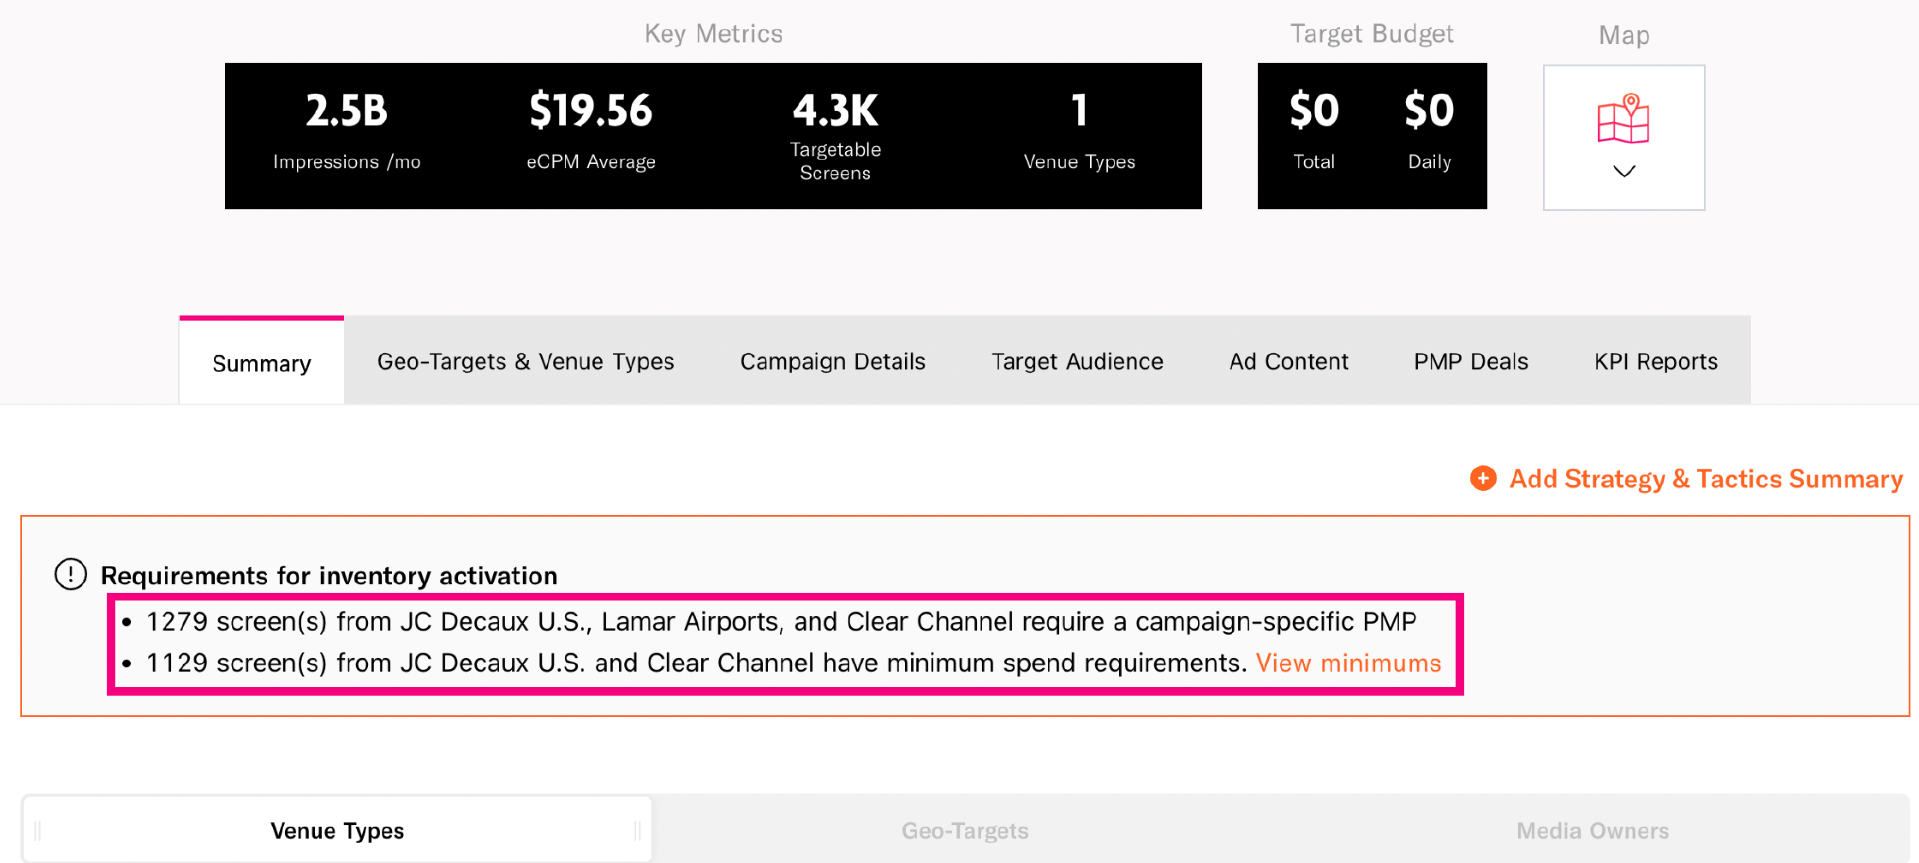
To confirm if your campaign uses PMP networks, open the Summary tab in your campaign plan. If PMP networks are included, the Adomni DSP will notify you in the “Requirements for Inventory Activation” section (pictured below).
Sufficient Credit:
Before launching, ensure your account has enough credit balance to activate your campaign.
A best practice is to load enough credits to cover the full campaign budget, ensuring complete delivery and even pacing throughout the flight.
How do I optimize my campaign while it's running?
Once your campaign is live, you can edit nearly every aspect of it in real time. This includes targeting, budget allocation, scheduling, and creative assets.
Programmatic DOOH inventory is dynamic. Screens selected during planning may go in and out of availability while a campaign is live. Because of this, campaigns are not guaranteed to run on every selected screen. Changes in availability may also impact impression delivery and budget pacing, particularly if lower-CPM screens or a limited number of screens were selected.
Campaign performance metrics become available once your campaign is live on the campaign dashboard. From your Campaign Dashboard, click the three dots next to a campaign that has launched and select “Performance Report”. You’ll be able to adjust date ranges and time zones, and download reports in CSV format for detailed analysis.
Reviewing these metrics can help you identify opportunities to optimize your campaign to better achieve your goals.
How do I lower my campaign’s CPM/increase impression delivery?
Lowering your campaign’s average CPM can help your budget stretch further, resulting in more impressions.
Remove high-CPM devices or venue types
Some screens or venue types have higher CPMs than others. If certain placements are significantly more expensive, consider removing them.
This allows more of your budget to be spent on lower-cost screens, which can reduce your campaign’s overall CPM and increase impression delivery.
Adjust budget allocation across venue types
Use the Budget Allocation Tool to shift more budget toward venue types with lower CPMs.
This helps control how much spend goes to higher-cost placements and allows more budget to flow to lower-cost inventory, improving overall campaign efficiency.
Reduce dayparting on higher-CPM venue types
If certain venue types are more expensive, you can reduce the hours during which ads run on those venues.
This allows you to keep those venues in the campaign while limiting spend on them. More impressions will then be delivered on venue types that run during longer dayparts at lower CPMs.
How do I increase ad spend delivery?
If your campaign is not spending its full budget or delivering impressions slower than expected, expanding targeting and availability can help.
Add all available creative sizes
Different screens require different creative sizes. If some sizes are missing, your ads may not be eligible to run on certain screens.
Make sure all recommended ad sizes are uploaded. If needed, use the Creative Resizing Tool to generate missing sizes.
Expand dayparting
If your ads are scheduled to run only during narrow time windows, delivery opportunities may be limited.
Opening up dayparting allows your ads to run during more hours of the day, increasing available inventory and improving delivery.
Extend the campaign flight
If your campaign duration is very short, there may not be enough time for the full budget to spend.
Extending your campaign flight can create more opportunities for impressions and help ensure your full budget is delivered.
Add more devices or venue types
Expanding the types of screens included in your campaign increases the available inventory where your ads can run.
This often improves delivery speed and helps spend your budget more efficiently.
Expand location or market targeting
If your campaign is targeting a very small geographic area, inventory may be limited.
Expanding your geographic targeting to include additional markets or locations increases the number of available screens and improves delivery opportunities.
Can I see my Proof of Play (POPs) photo?
Do I have to pay from my POP?
What is your POP policy?
What if I want to take my own POP photos?
Can I see my Proof of Play (POPs) photo?
Yes. POP photos are available for campaigns that meet Adomni's minimum budget requirements, or can be purchased for $175 per photo, per campaign if a webcam-enabled version is not available. Self-service clients can submit a request through their Adomni account; managed service clients should contact their CSM. Find our full POP photo policy here.
Do I have to pay for my POP?
You can now pay to request a POP photo. If a digital (webcam-enabled) version is not available, you may purchase an in-person photo for $175 per photo, per campaign. If we are unable to capture the photo, you will not be charged.
POP photos from webcam-enabled inventory are still provided at no additional cost, as are POP photos for campaigns with a total budget of $50,000 or more.
To request a POP photo, self-service clients can submit a request through their Adomni account; managed service clients should reach out to their Customer Success Manager (CSM). Find our full POP photo policy here.
What is your POP policy?
POP photos from webcam-enabled inventory are provided at no additional cost. Complimentary photographer captured POP photos are also included for campaigns with a total budget of $50,000 or more. For campaigns that don't meet this threshold, you can purchase an in-person POP photo for $175 per photo, per campaign if a digital version is unavailable. Please note that POP photos are not guaranteed — if we are unable to capture the photo, you will not be charged.
To request a POP photo, self-service clients can submit a request through their Adomni account; managed service clients should reach out to their CSM. Find our full POP photo policy here.
What if I want to take my own POP photos?
If you'd like to capture your own Proof of Play (POP) photos in the field, here are some best practices to help you succeed:
- Run Your Standard Campaign First
- Allow your campaign to run for a few days to generate performance data.
- Use this data to identify which device IDs consistently receive ad plays. These devices will be your best candidates for a photoshoot.
- Identify a Reliable Device ID
- Open the Hourly Performance Report.
- Look for device IDs with steady impression delivery. Consistency means a higher chance of capturing your ad during the shoot.
- Evaluate Location and Frequency
- If you have a specific screen or area in mind, check how frequently that device ID is receiving plays.
- If delivery is lower than ideal, you can increase the chances by:
- Adding the device ID in the Budget Allocation section.
- Assigning it a higher percentage of your campaign budget.
- Note: This only works if the screen has available inventory.
- Assess the Physical Environment
- Use Google Street View to check the screen's location.
- Make sure there's a safe, unobstructed spot for the photographer to capture the ad.
- Set Up a Dedicated "POP" Campaign
- Create a new campaign specifically for Proof of Performance.
- Target only the chosen device ID (add it under Advanced in the Geo-Targets & Venue Type tab).
- Use the same creative ID as your main campaign to avoid re-approval delays.
- Do not upload duplicates, as they will generate a new ID that requires approval.
- Temporarily Reallocate Budget (Optional)
- If you'll be monitoring the shoot live, reallocate more budget to the target device ID.
- Use Budget Allocation by Device ID in the Campaign Details tab.
- After the shoot, reset your budget to its original allocation to avoid over-delivery.
- Use this only if you're actively managing the campaign and willing to overinvest briefly.
- Check Availability on the Day of the Shoot
- For billboards, availability may change due to direct sales.
- Use the Hourly Report on the morning of your shoot to confirm the device is still active.
- Account for Double-Sided Screens
- Many billboards are two-sided.
- If you don't know which side will display your ad, include both device IDs in your POP campaign to maximize chances.
- Include Facing Direction
- If only one side of the billboard is active, confirm the facing direction (e.g., northbound, east-facing).
- Share this with the photographer so they capture the correct view.
How do I pull a performance report?
How can I access the cross-campaign reporting?
How can I obtain MAIDs (Mobile Device IDs) as a self-serve client?
How can I retarget individuals who have seen my DOOH ads as a self-serve client?
How do I pull a performance report?
From your Campaign Dashboard, click the three dots next to a campaign that has launched and select Performance Report. You’ll be able to adjust date ranges and time zones, and download reports in CSV format for detailed analysis. Reports help you understand delivery, impressions, pacing, and performance across different metrics.
How can I access the cross-campaign reporting?
Use the Campaign Groups feature to organize related campaigns. Once grouped, you can view reports across multiple campaigns in one place, making it easier to track collective performance and identify trends.
How can I obtain MAIDs (Mobile Device IDs) as a self-serve client?
To request MAIDs, please contact your Client Success Manager.
Please note that MAIDs are generated with a 4-day delay, so you can expect to receive your list approximately four days after your campaign flight ends.
How can I retarget individuals who have seen my DOOH ads as a self-serve client?
Direct retargeting of audiences exposed to your DOOH ads is not currently available through self-serve campaigns.
If you’d like to enable retargeting, please reach out to your Client Success Manager for assistance setting up a managed service retargeting campaign.
- A minimum DOOH campaign budget of $125K is required.
- Once your campaign is active, Adomni will identify the MAIDs (mobile device IDs) exposed to your DOOH screens.
- These MAIDs are securely passed through LiveRamp and can be used to target audiences on Connected TV (CTV) or Online Video (OLV) platforms.
Do my credits expire?
Can I get a refund of unused credits?
What happens if I don’t use my account?
Are there any fees?
What if my payment is disputed?
How to add credits to your account?
Do my credits expire?
No. Your Prepaid Advertising Credits never expire. You can use them anytime for AdOmni campaigns.
Can I get a refund of unused credits?
No. Once funds are loaded as Prepaid Advertising Credits, they cannot be refunded. They can only be used for advertising campaigns on AdOmni.
What happens if I don’t use my account?
We’ll check in with you if your account is inactive:
After 12 months, we’ll send you a reminder.
After 24 months, we’ll send a second reminder.
After 30 months, we’ll send a final reminder.
If there’s still no activity, we may be required by law to send your unused balance to your state’s unclaimed property office after a set dormancy period (typically 3–5 years).
Are there any fees?
No. We don’t charge inactivity fees, dormancy fees, or maintenance fees on your credits.
What if my payment is disputed?
If a payment dispute is opened with your card issuer, we may temporarily freeze your account or deduct the disputed amount until it’s resolved.
How to add credits to your account?
Follow these simple steps in your AdOmni account:
- Log in to your Adomni account.
- Go to Account Settings and navigate to the new Billing section.
- Under Payment Methods, click Add Payment Method to enter your credit card details.
- Your first card will automatically be set as your default.
- Once a card is added, click Add to Credit Balance to fund your account
Can’t find what you’re looking for? Explore more FAQs